OpenCV - Read, Write and Edit Images
Installing OpenCV in Anaconda 
It is advisable to create a new environment for every project. So create a new enviroment called "opencv" for example. Open Anaconda prompt and enter the following command.
conda create --name opencv
Activate the newly created environment "opencv".
conda activate opencv
Install OpenCV from conda-forge. conda-forge is the preferred channel to install OpenCV and not menpo anymore (menpo is outdated).
conda install -c conda-forge opencv
Reading an image from a file to OpenCV 
We will explore basic image reading and display options with OpenCV. More info at OpenCV docs.
# Importing libraries
import cv2 # OpenCV library
import numpy as np # NumPy
cv_img=cv2.imread("../../files/ml/001/cat_eye.jpg") # relative or absolute path to the image file
cv_img
The above output shows a numpy array of RGB values of the image.
Display the image with OpenCV
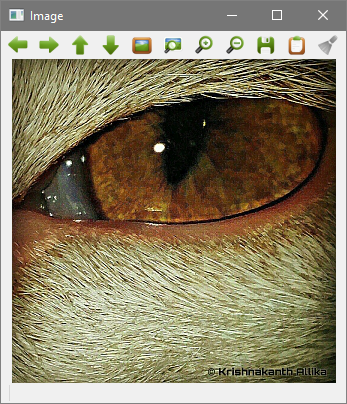
OpenCV has a imshow() to display an Image from an OpenCV array in a new window.
cv2.imshow("Image",cv_img)
cv2.waitKey(delay=5000) # Display image for 5 seconds
cv2.destroyAllWindows() # Close all image windows
The image opens in a new window and looks like the following:
Closing the imshow() window using an ESCAPE key instead of a timer. The ASCII value of the ESC key is 27.
cv2.imshow("Image",cv_img)
if cv2.waitKey()==27:
    cv2.destroyAllWindows()
The image displayed in a seperate window until I pressed the ESC key.
Display using PIL
We need to convert the OpenCV image array to a PIL image. If PIL is not installed, you can install it by entering the following command in Anaconda prompt.
conda install pillow
OpenCV stores images in BGR format whereas image files store them in RGB format. We need to convert BGR to RGB first. If not, this is how the image file is written.
from PIL import Image
Image.fromarray(cv_img)

# Converting BGR to RGB
img_array=cv2.cvtColor(cv_img,cv2.COLOR_BGR2RGB)
# Converting to PIL image
img=Image.fromarray(img_array)
img

Display using matplotlib
If not already installed, Matplotlib can be installed by typing the following command in Anaconda prompt.
conda install matplotlib
from matplotlib import pyplot as plt
#Show the image with matplotlib
plt.imshow(cv2.cvtColor(cv_img, cv2.COLOR_BGR2RGB)) # convert from BGR to RGB before plotting
plt.show()

Reading in grayscale
cv_img=cv2.imread("../../files/ml/001/cat_eye.jpg",0) # the second argument '0' is for grayscale
cv_img
plt.imshow(cv2.cvtColor(cv_img, cv2.COLOR_BGR2RGB)) # convert from BGR to RGB before plotting
plt.show()

[^top]
Reading in reduced grayscale
cv_img=cv2.imread("../../files/ml/001/cat_eye.jpg",64) # the second argument '64' is for reduced grayscale 8
cv_img
plt.imshow(cv2.cvtColor(cv_img, cv2.COLOR_BGR2RGB)) # convert from BGR to RGB before plotting
plt.show()

[^top]
Reading in reduced colour
cv_img=cv2.imread("../../files/ml/001/cat_eye.jpg",65) # the second argument '65' is for reduced colour 8
cv_img
plt.imshow(cv2.cvtColor(cv_img, cv2.COLOR_BGR2RGB)) # convert from BGR to RGB before plotting
plt.show()

[^top]
Writing an image to a file with OpenCV 
cv2.imwrite() takes the arguments file path and OpenCV image array.
cv_img=cv2.imread("../../files/ml/001/cat_eye.jpg") # reading an image from a file
cv2.imwrite("../../files/ml/001/cat_eye_new.jpg",cv_img) # writing an image to a file
Image.open("../../files/ml/cat_eye_new.jpg")

Both images look the same but they are not the same as you notice below. Why?
cv_img_new=cv2.imread("../../files/ml/001/cat_eye_new.jpg")
np.array_equal(cv_img,cv_img_new)
[^top]
Reading an image from a URL to OpenCV 
We are going to attempt to read an image directly from a URL in to OpenCV. It is possible to download the images manually in to a local drive and then read them with the cv2.imread() method, but at times we will need to read files directly from a URL.
Here is a link to an image of my cat's eye that we are going to access: https://go.allika.eu.org/cateye
NumPy and OpenCV are required, so they are imported.
# Importing libraries
import cv2
import numpy as np

# Image URL
url="https://go.allika.eu.org/cateye"
There is more than one way to read images to OpenCV from URLs. We explore a few.
1. Using urllib3 
# Importing libraries
import urllib.request as urlRequest
Specify header type
url_request = urlRequest.Request(url, headers={'User-Agent': 'Mozilla/5.0'})
Get URL response.
url_response=urlRequest.urlopen(url_request).read()
Convert URL data in to a NumPy array
img_array = np.array(bytearray(url_response), dtype=np.uint8)
Read the array in to OpenCV
cv_img = cv2.imdecode(img_array, -1)
View image in OpenCV
cv_img
[^top]
2. Using urllib3 and PIL 
# Importing libraries
import urllib.request as urlRequest
from PIL import Image
Specify header type
url_request = urlRequest.Request(url, headers={'User-Agent': 'Mozilla/5.0'})
The image is read directly from the URL in to a PIL image.
img = Image.open(urlRequest.urlopen(url_request))
Since this is a PIL image, we can view the image here. Let's make sure we have the correct image.
img
We can view the RGB values of an image by converting it to a NumPy array
np.asarray(img)
However, OpenCV uses BGR format instead of RGB format. We need to specify the color code when we convert the image to OpenCV format.
cv_img=cv2.cvtColor(np.array(img), cv2.COLOR_RGB2BGR)
View image in OpenCV
cv_img
We can see the difference between the NumPy array output of the image and the OpenCV output. The RGB values are reversed.
[^top]
3. Using PIL, requests and BytesIO 
# Importing libraries
from PIL import Image
import requests
from io import BytesIO
Read data from URL
response = requests.get(url)
Read URL response in to a PIL image using BytesIO
img = Image.open(BytesIO(response.content))
Let's view the image.
img
Rest is same as the method 2. Images have pixels in RGB format but OpenCV uses BGR. We need to specify the color code when we convert the image to OpenCV format.
cv_img=cv2.cvtColor(np.array(img), cv2.COLOR_RGB2BGR)
cv_img
[^top]
Last updated 2020-12-16 16:37:03.467510 IST
Comments